Restauration
Cette page présente l'interface de restauration.
Fonctionnement
Il est nécessaire de se connecter à la console pour restaurer des données.
➡️ Accéder à la console Arx One
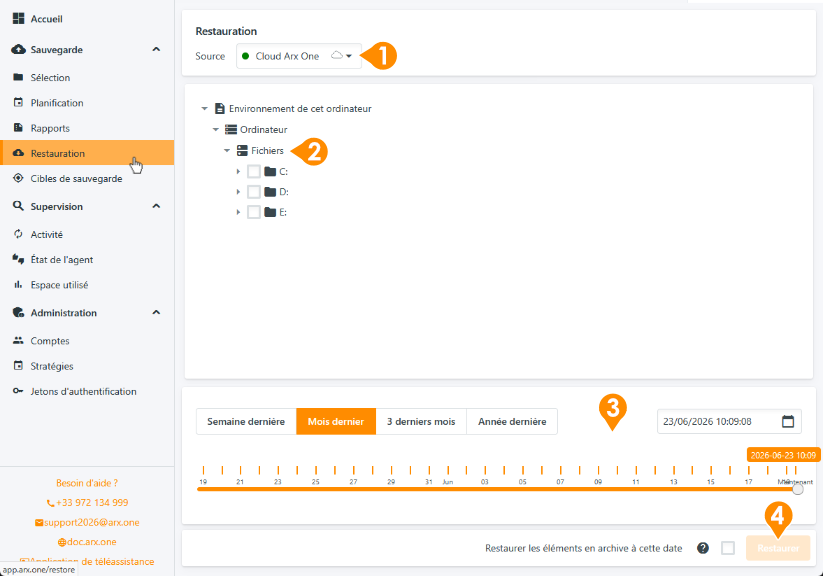
Une fois connecté, sélectionnez l'activité Restauration dans la section Sauvegarde.
La démarche de restauration se déroule en quatre choix successifs :
- Source de restauration
- Données à restaurer
- Date à restaurer
- Cible de restauration
Détail des étapes
1. Source de restauration
Si plusieurs cibles de sauvegarde sont configurées, il est possible de choisir depuis quelle source lancer la restauration.
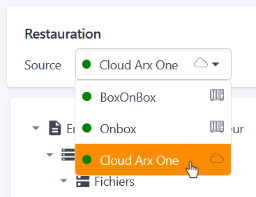
💡 Les cibles de réplication ne sont pas visibles, car la réplication ne nécessite pas de passer par une restauration. Comprendre la différence entre sauvegarde et réplication
2. Données à restaurer
Développer l'arborescence jusqu'à atteindre les données à restaurer. Les données visibles sont uniquement celles présentes dans la source de restauration.
Sélectionner chaque élément en cliquant sur la case à cocher située à gauche du nom 1️⃣.
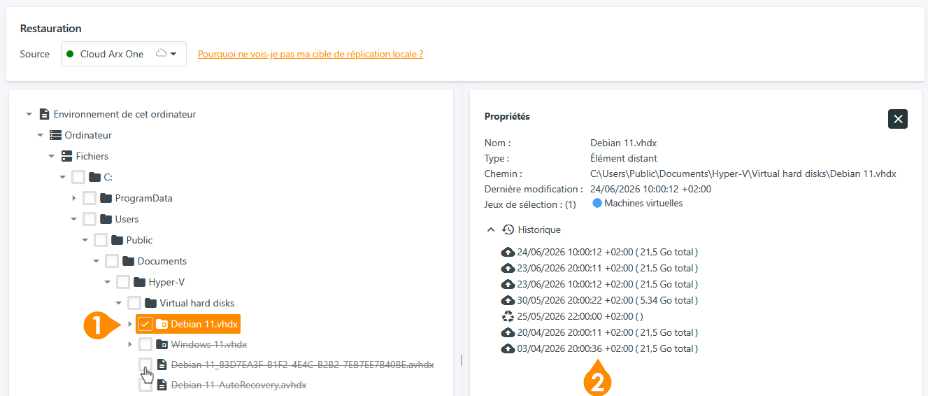
Cliquer sur un élément permet d'afficher ses propriétés et de visualiser les versions disponibles dans la rétention choisie 2️⃣.
💡 Les éléments qui sont barrés ne sont pas présent au point de restauration choisi (pas encore créés ou supprimés du système). Les propriétés peuvent vous permettre d'identifier à quel moment ces données sont disponibles et à choisir le bon point temporel de restauration (étape 3, ci-dessous)
La sélection des données à restaurer fonctionne de façon explicite comme la sélection de sauvegarde.
3. Date de restauration
La restauration sert à récupérer des données à un état antérieur cohérent.
Il est possible de modifier la date à laquelle restaurer vos données de deux façons :
- Un clic sur la date et l'heure 1️⃣ il est possible de revenir très précisément à un moment dans le temps.
- La réglette temporelle 2️⃣ permet également de se positionner à un point précis du temps. Les boutons situés au-dessus de la réglette 3️⃣ permettent de modifier l'échelle de temps de cette dernière.
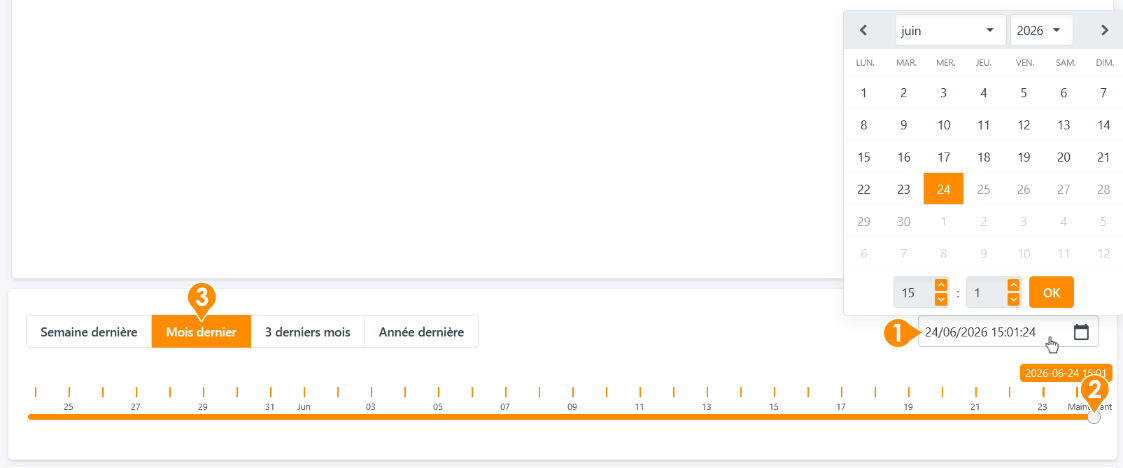
💡 Par défaut, les données sont restaurées dans leur dernier état connu.
⚠️ Si des �éléments sont barrés, cela signifie qu'ils n'existaient pas à la date sélectionnée.
4. Option et cible de restauration
Option : Restauration des éléments en archive
Les éléments barrés à la date demandée ne sont pas restaurés, car n'existant pas à la date demandée.
En cas de besoin de restauration des données à la suite de suppressions multiples à des moments différents, il peut être intéressant de cocher l'option "Restaurer les éléments en archive à cette date".
Cela aura pour effet de restaurer les dernières versions disponibles de l'ensemble des éléments présents dans la sélection.
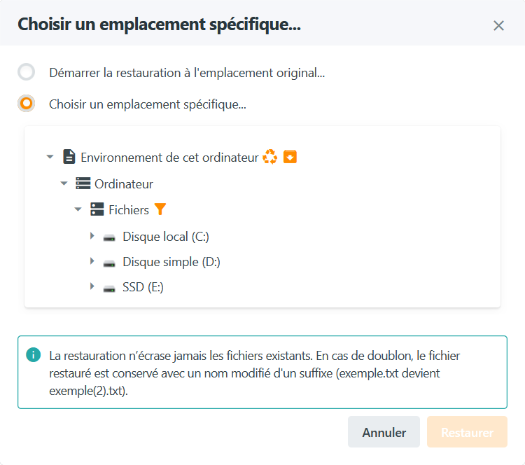
Cible de restauration
En cliquant sur le bouton "restaurer", un dialogue permet de choisir de restaurer les donneés à leur emplacement d'origine ou à un emplacement spécifique.
⚠️ Même dans le cadre d'une restauration granulaire depuis une VM, il n'est pas possible de restaurer des données à l'intérieur d'une VM.
Considérations sur la restauration
Interactions avec la production
Pour des raisons de sécurité, nos agents ne modifient pas les configurations et donneés présentes sur les infrastructures cibles après restauration.
Ce que cela signifie :
- Pas de redémarrage automatique de VM
- Pas de réintégration de bases de données dans les gestionnaires (SQL Server, HFSQL...)
- Pas d'écrasement d'un fichier existant
- Pas de restauration d'un fichier dans une VM
Repères visuels à la restauration
La fréquence de modification des éléments sauvegardés est très variables :
- La sauvegarde continue traite les éléments au fil des modifications
- Une sauvegarde planifiée ne va traiter que les éléments modifiés depuis la dernière sauvegarde.
Les éléments affichés barrés dans la sélection, comme l'information sur les versions disponibles, permettent d'avoir une vision précise des versions disponibles, élément par élément.
Il n'y a pas de repère visuel dans la réglette temporelle, car une planification déclenchée ne signifie pas une version spécifique : la sauvegarde continue est indépendante des planifications et les éléments ne sont pas systématiquement sauvegardés à chaque planificiation.